This tutorial followed step by step will help you understand why TypeScript + React are awesome 💪 while building a simple to-do app. I made it beginner friendly but it requires some basic React and JavaScript knowledge.
BTW StackBlitz (tool for online editing used above) is powered with VS Code and great TypeScript support. You can check most of the TypeScript features just manipulating the code there!

TypeScript can help you create maintainable and scalable web apps. It is ready to use with React out of the box! Thanks to Create React App package with TypeScript support, configuration part is very easy nowadays.
Why use TypeScript (in React)
Recognize those silly errors
I ❤️ TypeScript for giving me instant feedback if I am wrong with my code. Look for top 10 JavaScript error. I am sure that as a web developer you know them well.

7 of them are about mixing up your types, not accessing the right variable, object property, etc. With TypeScript, you will rarely see them! Your configured IDE will tell you about them in advance.
Another thing is code maintaining and refactor. Did you ever modified some property in your large app and went through all the classes and properties wondering what you just messed up and fixing here and there? Here TypeScript + your IDE will be your help as well.
Fits React very well
If you ever liked Angular for having TypeScript support you will love React even more. Template engine from a developer point of view is very different - in Angular you have dummy HTML-like files, in React there is JSX, turning into TSX with TypeScript. This means you get static type checking in your templates as well!
Supported via Create React App
As our prophet once announced, Create React App supports TypeScript out of the box, which makes starting a new app (also migrating from these relatively new) A LOT EASIER 🎉
Create React App 2.1 + TypeScript = 💜 https://t.co/tpb04toZ95 pic.twitter.com/zBTVb0qa3U
— Dan Abramov (@dan_abramov) October 30, 2018
Got super trendy
Just see the results from the latest State of JS survey:

TypeScript is gaining popularity of Flow which is a very similar library of Facebook. Even Jest, the 1st choice testing library in React ecosystem, got migrated to TypeScript.
Summing up, I heard a nice comparison on the React Podcast which was more less:
TypeScript is like a cool buddy you would like to pair program with 💪
How to start 🚀
The right IDE
For your best experience, you should use VS Code. It is Microsoft open-source IDE and TypeScript is from Microsoft as well. You will have the best integration there and I know people moved from WebStorm to VS Code since they started using TypeScript.
TypeScript is all about developer experience, what is going on in your IDE. How fast and well will you be informed about errors you are about to make
Create React App
We start with lunching create-react-app project. It is recommended by CRA creators to use npx instead of installing create-react-app globally, to make sure you start with the latest version.
Important! Before running below make sure you don’t have CRA globally installed anymore! You might encounter issues like here
npm uninstall -g create-react-app
We will make use of a fresh new --typescript flag.
npx create-react-app react-ts --typescript
cd react-ts
and then your TS based app should appear. Check if it starts with npm start. Then have a quick look at how it differs from regular CRA starter:
.ts and .tsx files
.ts are regular TypeScript files, basically replacing .js. While using .jsx for files containing React Components with JSX code is not mandatory, with TypeScript you need to always use .tsx when you write TSX code.
tsconfig.json
This file indicates that the directory is a root of a TypeScript project. It is a starting point for compiler so it contains some configuration options:
{
  "compilerOptions": {
    "target": "es5",
    "lib": [
      "dom",
      "dom.iterable",
      "esnext"
    ],
    "allowJs": true,
    "skipLibCheck": true,
    "esModuleInterop": true,
    "allowSyntheticDefaultImports": true,
    "strict": true,
    "forceConsistentCasingInFileNames": true,
    "module": "esnext",
    "moduleResolution": "node",
    "resolveJsonModule": true,
    "isolatedModules": true,
    "noEmit": true,
    "jsx": "preserve"
  },
  "include": [
    "src"
  ]
}
You can look up what particular options are for in docs.
An interesting one is strict which is provided by default in CRA configuration. Following documentation:
Enable all strict type checking options. Enabling –strict enables –noImplicitAny, –noImplicitThis, –alwaysStrict, –strictBindCallApply, –strictNullChecks, –strictFunctionTypes and –strictPropertyInitialization.
Strict mode enables you to use the power of TypeScript and not neglecting type checks possibilities. You might not turn it on if you transfer your JavaScript app to TypeScript but for a start it is definitely recommended.
Coding the app
Let’s clear the app, delete App.css and leave only a dummy skeleton in App.tsx
.
import React, { Component } from "react";

class App extends Component {
  render() {
    return (
      <div>
        <h2>Hello React TS!</h2>
      </div>
    );
  }
}

export default App;
So far it looks identical to a JS React component. Next thing we might consider is what data will our app keep. Basically, some tasks. We will define a model of a task in a separate folder which is a good practice. In src/models/task.ts:
export interface Task {
  id: number;
  name: string;
}
You might see people adding an I prefix to annotate that this is an interface (like ITask here), mostly coming from Java or C# background. I wouldn’t consider it a good practice. I didn’t see any case ever in my TypeScript code to use it and certainly we are good with simple Task here.
Creating a task
Let’s create our first component in components/NewTaskForm.tsx
import React, { FunctionComponent } from "react";
import { Task } from "../models/task";

interface Props {
  onChange: (event: React.ChangeEvent<HTMLInputElement>) => void;
  onAdd: (event: React.FormEvent<HTMLFormElement>) => void;
  task: Task;
}

export const NewTaskForm: FunctionComponent<Props> = ({
  onChange,
  onAdd,
  task
}) => (
  <form onSubmit={onAdd}>
    <input onChange={onChange} value={task.name} />
    <button type="submit">Add a task</button>
  </form>
);
You need to annotate a type to NewTaskForm component, which is FunctionComponent imported from react . The funny <> brackets indicates that this is a generic interface. Thanks to this you can get type checking inside of the component in your TSX code. You are supposed to put your Props interface, which describes what properties this component gets from the parent one.
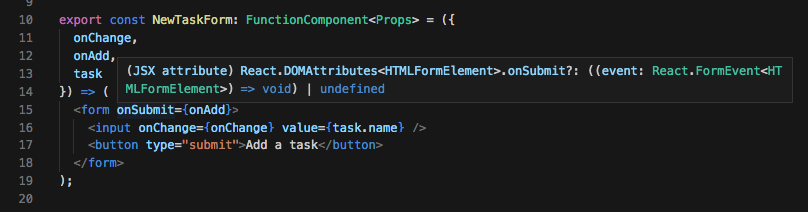
Props interface looks bit cryptic with these callbacks. onChange property expects to get a function with one event argument. If you ever dealt with forms in React you probably know this one well. We will use data from the event object in the parent component, so we need to annotate its type. It’s not that hard as you might think!
Just move your mouse over the form onSubmit and your IDE should help you to find out what property type is expected. We pass a callback to form instead of a button to get action on both clicking the button end hitting enter after typing.
Anyway, if annotating types is somehow blocking you, or isn’t possible at the moment, you can always get away with:
// TODO: annotate event types properly
interface Props {
  onChange: (event: any) => void;
  onAdd: (event: any) => void;
  task: Task;
}
Bringing to life
We will use React State to handle tasks changes so we need to annotate a type to it as well. In src/App.tsx:
interface State {
  newTask: Task;
  tasks: Task[];
}

class App extends Component<{}, State> {
  state = {
    newTask: {
      id: 1,
      name: ""
    },
    tasks: []
  };

  render() {
    return (
      <div>
        <h2>Hello React TS!</h2>
        <NewTaskForm
          task={this.state.newTask}
          onAdd={this.addTask}
          onChange={this.handleTaskChange}
        />
      </div>
    );
  }
}
This time we annotated State interface and put it into a generic Component interface as a second argument. The first one is Props again, since App component doesn’t have any, we put an empty object.
Since we don’t need to perform any tasks in the class constructor we are ok to use a class property state to define it. Just look how TypeScript is making sure we declare it properly, say we forgot to initialize tasks with an empty array:
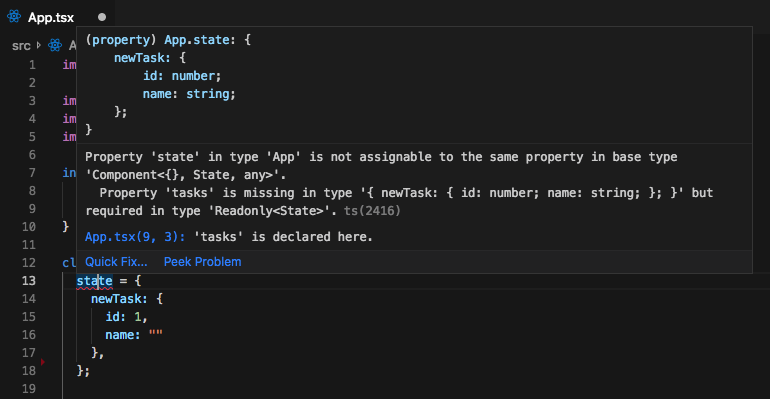
Cool stuff!
Lets add some methods to make NewTaskForm component work and finally render something:
private addTask = (event: React.FormEvent<HTMLFormElement>) => {
  event.preventDefault();

  this.setState(previousState => ({
    newTask: {
      id: previousState.newTask.id + 1,
      name: ""
    },
    tasks: [...previousState.tasks, previousState.newTask]
  }));
};

private handleTaskChange = (event: React.ChangeEvent<HTMLInputElement>) => {
  this.setState({
    newTask: {
      ...this.state.newTask,
      name: event.target.value
    }
  });
};
We mark them private since this is how we annotate methods which shouldn’t be accessed outside of the class. state property doesn’t have such prefix, so it’s public - this is a default behavior you can read more about here. Try to mark it as private, TypeScript won’t let you!
If you write them by yourself, you will see how helpful TypeScript is with autocompletion. If we would annotate event as any, we wouldn’t get any help with it, just with React setState method.
You should see only a simple form where you can name a task and add it since we do not render this.state.tasks yet. Let’s make it happen!
Render tasks and delete
To complete our simple app let’s add a method to delete a task.
private deleteTask = (taskToDelete: Task) => {
  this.setState(previousState => ({
    tasks: [
      ...previousState.tasks.filter(task => task.id !== taskToDelete.id)
    ]
  }));
};
Then a task list with an item inside:
In src/components/TaskList.tsx:
import React, { FunctionComponent } from "react";

import { Task } from "../models/task";
import { TaskListItem } from "./TasksListItem";

interface Props {
  tasks: Task[];
  onDelete: (task: Task) => void;
}

export const TasksList: FunctionComponent<Props> = ({ tasks, onDelete }) => (
  <ul>
    {tasks.map(task => (
      <TaskListItem task={task} onDelete={onDelete} />
    ))}
  </ul>
);
In src/components/TaskListItem.tsx:
import React, { FunctionComponent } from "react";

import { Task } from "../models/task";

interface Props {
  task: Task;
  onDelete: (task: Task) => void;
}

export const TaskListItem: FunctionComponent<Props> = ({ task, onDelete }) => {
  const onClick = () => {
    onDelete(task);
  };

  return (
    <li>
      {task.name} <button onClick={onClick}>X</button>
    </li>
  );
};
Since I don’t use any event item in deleteTask method I decided to not pass it, rather just the task itself. This might be handled many other ways :)
Summary
After we add the TaskList component in App.tsx we are done with creating a simple to-do list app with React + TypeScript! I am so excited how Create React App with --typescript flag made the configuration part so simple. As you see, writing components, TSX, handling state doesn’t differ much! After you combine it with static types with superfast feedback from your IDE you might get in love in TypeScript like me ❤️.
There are many other areas worth explanation where TypeScript helps. Refactoring, handling external libraries and so on… I will made next parts of this tutorial which will emphasize these parts.
I encourage you to write the code by yourself in your IDE, see if TypeScript helps you and play around with the app. In case of any problems - the comment section is here below with me eager to help 🙂